Why does adding SVG images to PowerPoint sometimes make the file so large?
When most people think of SVGs they imagine very small, scalable graphics. So it can come as a surprise when after adding one or more of these images to a PowerPoint presentation, the file size of the deck suddenly inflates massively. Here we are going to explain why this happens and give you some tips on what you can do about it.
First we’ll cover some basics:
What is an SVG?
SVG stands for Scalable Vector Graphics and they are vector images that are drawn using mathematical formulas rather than pixels. This makes them infinitely scalable without quality loss. They are really great for simpler drawings, shapes, icons etc. but not so good as you move towards photographic pictures, which are better represented with raster graphics like JPEG or PNG.
How do I import SVG into PowerPoint?
SVGs can be added to any version of PowerPoint 2016 or later, in the same way as you add any other image. To import an SVG into PowerPoint just click on the Insert tab, then Pictures and choose from this device or online.

How do I export SVG images from PowerPoint?
If you have a lot of SVG graphics in a presentation and you want a quick way to extract them all, then I recommend our PowerPoint add-in Slidewise - which makes this really easy. As soon as you open Slidewise it will list all of the SVGs in the open presentation. Simply click the menu button alongside SVG and choose Export Original Media… and choose where to save all of the SVGs.

If you only need to do this for one or two graphics, you can just right-click on the image and choose Save as picture… from the menu to export the SVG from PowerPoint.
Why use SVG images in PowerPoint?
There are many good reasons to use SVG images - the first is that they can be flexibly resized without losing quality. This makes them super versatile if you need to use the same graphic at multiple sizes, for example. The same single graphic will look sharp at any size.
SVG graphics can also be recoloured using the standard controls in PowerPoint without losing any quality - simply select the SVG and then change the fill, outline colour etc.
Finally, SVG images are usually very small, which is attractive for PowerPoint as large file size is so often a problem. However, there is one teeny-tiny problem… sometimes adding SVGs can, instead, dramatically inflate your file size.
Incidentally, PowerPoint’s native shapes give the same benefits as SVG and do not suffer from the size bloat we’re discussing here. The excellent Build-a-Graphic library gives you access to over 10,000 graphic elements and infographics entirely made using PowerPoint shapes.
How can SVG images increase PowerPoint file size so much?
When you import any SVG graphic into PowerPoint it automatically generates a PNG version of the SVG for backward compatibility with PowerPoint 2013 and earlier. In some circumstances this can create PNGs that are many times larger than the original SVG.
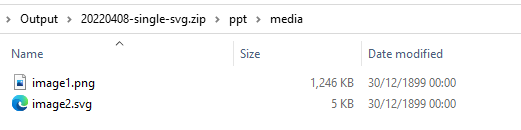
It’s not possible to see these generated PNGs in the PowerPoint UI. However if you look in the media folder within a PPTX file, like in this example where a single 5 KB SVG has been added to a blank presentation, you can clearly see that a massive 1,246 KB PNG has been automatically created.
You see a clear view of SVG images and their associated PNGs use our helpful Slidewise PowerPoint Add-in. Using its Image Audit feature you can see a list of all the auto-generated PNG images created from SVGs in your deck and also how large they are, to see if they are causing you any problems.

Slidewise image audit showing SVG and auto-generated PNGs
It also allows you to see the relationship between individual SVG and PNGs. Viewing this SVG (image37.svg) in Slidewise, you can see that it is just 11 KB but the auto-generated PNG (image36.png) is a massive 1,578 KB!

Slidewise inspector showing SVG and its connected PNG image.
Depending on the complexity of the SVG the size of the PNGs can vary dramatically. They are usually larger than the corresponding SVG, however not always. Some SVGs can end up being very large and the PNG is actually smaller. This is usually a sign that SVG is not the best format for whatever image is being rendered.

Large SVG with smaller auto-generated PNG in PowerPoint.
You also have the option to follow these instructions from Microsoft to change your presentation to a zip file and look at the images in the media subfolder. You’ll be able to see if you have any .svg files here and by looking at each one, you should then be able to identify the associated PNG files.
There is no way to disable or remove the PNGs associated with SVGs using PowerPoint, however all is not lost – here are a few ideas for what to do if you have a presentation where the auto-generated PNGs are making your file too large.
How to reduce the size of SVG/PNGs in PowerPoint
Convert SVG to a PowerPoint shape
One other option you have is to convert the SVG to a PowerPoint shape. This has the benefit of removing the SVG and PNG from the file, which can reduce the size significantly. However, not all SVGs will be suitable to render as shapes in PowerPoint, so you may see some visual degradation in the quality of the graphic when you convert it. To do this simply right-click on the graphic and choose Convert to Shape.

This approach has the benefit of working in all versions of PowerPoint on Windows and on Mac.
On the subject of PowerPoint shapes, Mike Parkinson’s Build-a-Graphic Add-in is a viable alternative to using SVGs. It gives you access to over 10,000 awesome graphic elements and infographics. Everything in this library is created as PowerPoint shapes, so they are tiny and you can insert, scale and recolor them with standard PowerPoint tools.
Convert SVG to EMF
Depending on your situation it may work well for you to convert the SVG/PNG files to EMF (Enhanced Metafile Format). These are vector graphics similar to SVGs – they are scalable without losing quality, however you can’t edit them in PowerPoint like you can SVGs. They do display in all versions of PowerPoint, although they can’t be converted to shapes on Mac as it doesn’t properly support EMF.
If you don’t need to edit them, and you just want small, scalable graphics, EMF may work well for you. Follow these steps to convert from SVG to EMF.
- Right-click on the image and choose Save as picture… from the menu.
- Change Save as type: to Enhanced Windows Metafile (*.emf).

- Replace the image in PowerPoint by right-clicking on the image and choosing Change Graphic > From a File…
Reduce color depth of auto-generated PNGs
To do this you will need to be comfortable with changing the file extension of your presentation to .zip and rummaging around inside. You also need a copy of Slidewise and NXPowerLite Desktop.
It is possible to convert the auto-generated PNGs to much smaller, more efficient 8-bit indexed colour images. The size reduction can often be as much as 60-80% smaller than equivalent 24/32-bit PNG files. This option has no backward compatibility issues; the compressed PNGs remain intact for viewing on PowerPoint 2013 or earlier.
Use the Slidewise image audit (shown above) to find all the auto-generated PNGs created from SVGs. Then click the ellipsis menu to the right and export the PNGs to a new folder.
Point NXPowerLite at the folder with the PNGs in, and set the “Save setting:” to “Replace original”
Change the extension of your presentation to .zip (follow Microsoft’s instructions to do this)
Navigate in Explorer to the /ppt/media folder
Copy the compressed PNGs into the media folder and choose to replace the files that are there.
Change the extension of your presentation back to .pptx
Replace auto-generated PNGs with tiny dummy PNGs
If you don’t need or want to preserve backward compatibility – then you can replace the PNG images with dummy placeholders. This leaves the crisp, editable SVG for viewing in PowerPoint 2016 or later, and almost completely eliminates the PNG size footprint, making each one a tiny 67-byte invisible PNG image.
However, be warned – anyone viewing the presentation on older versions of PowerPoint will not be able to see the image(s) as there will no longer be a PNG version of the SVG for PowerPoint to display.
Use the Slidewise image audit (shown above) to find all the auto-generated PNGs created from SVGs. Then click the ellipsis menu to the right and export the PNGs to a new folder. This is the list of files you will need to replace with the dummy.
Download this tiny dummy PNG (67 bytes) to a new folder on your computer.
Create copies of the dummy PNG and give each the name of one of the files you downloaded in step 1.
Change extension of your presentation to .zip (follow Microsoft’s instructions to do this)
Navigate using Explorer to the /ppt/media folder
Copy the dummies into the media folder and choose to replace the files that are already there.
Change the extension of your presentation back to .pptx
Note: If you subsequently alter an SVG by recoloring it for example, PowerPoint will regenerate a new uncompressed PNG.
Convert SVG to PNG
This last option is only if you don’t need to make use of the scaling or editing features of the SVGs. If a static raster image will work, and as PowerPoint is creating PNGs anyway, you can reduce file size by replacing the SVGs with optimized PNGs. This would work in all versions of PowerPoint on Windows and Mac.
You can do this just using PowerPoint and some free online tools. It’s pretty straightforward, and it gets good results.
Right-click on the image and choose Save as picture… from the menu to extract the SVG from PowerPoint.
Use a site like convertio.co to convert the SVG to a PNG.
Compress the PNGs with a site like wecompress.com.
Finally replace the image in PowerPoint by right-clicking on the image and choosing Change Graphic > From a File…
So that’s why SVGs sometimes make your presentations unexpectedly large. I hope these insights and tips will help you to keep your presentation file size under control when you encounter this issue in future. PowerPoint also automatically creates PNG files when you add image effects - for more on that check out our blog post on WDP files.
Also, if you want to get really serious with editing and controlling the colours of SVGs in PowerPoint then I recommend you read this great post from Bright Carbon on creating responsive SVGs and smart icons in PowerPoint.
To always have clear insight on what’s going on with your PowerPoint files be sure to start using our Slidewise add-in.