Why is my Excel file so large and how to reduce Excel file size?
If your Excel file suddenly feels very slow or laggy to work with, or you’ve just tried to share the file with someone and been told it’s too big and heavy to email, and you’ve found your way here then you probably wondering why...

The 6 most common reasons for Excel files getting too large are:
PICTURES: If your spreadsheet contains lots of pictures, or some very large images.
EXCESS FORMATTING: Excel sheets can contain millions of cells - and if you have formatting applied to them even without any data it can make truly massive Excel files. It’s harder to spot because the formatted cells can look just the same as the unformatted ones, if for example the formatting is specifying which font to use if there was any text.
BIG DATA: Sometimes you just have a lot of data.
PIVOT-TABLE CACHE: Data required for your pivot tables is saved inside the Excel file by default and this can get pretty big.
EMBEDDED OBJECTS: Other files embedded inside the spreadsheet for example, supporting documentation in PDF format.
EXTERNAL LINKS: Links to other spreadsheets.
Prefer video? Watch the video series instead.
Find out what is making your Excel file big
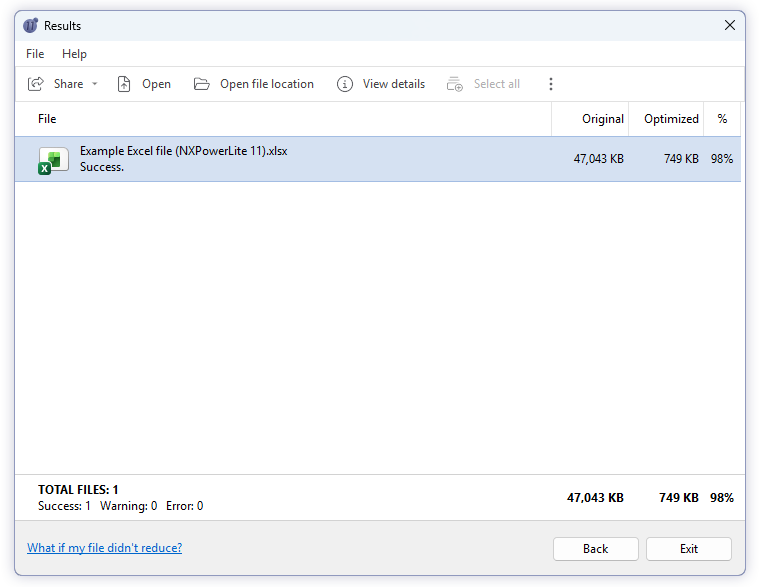
It can be pretty hard to figure out just by looking at your spreadsheet what is causing it to balloon in size. Which is why we built a file size audit tool into NXPowerLite Desktop. Now you can see exactly what's consuming space and preventing further size reduction.
Download the fully-functional free trial, and once installed, right-click on your XLSX file and choose NXPowerLite > View details.

After opening View details you will see the content is organized by size, with the largest items listed first. In this example, the main size is in Worksheets and Pivot table cache. Once you know what content is not being compressed, you can address it using the help below.
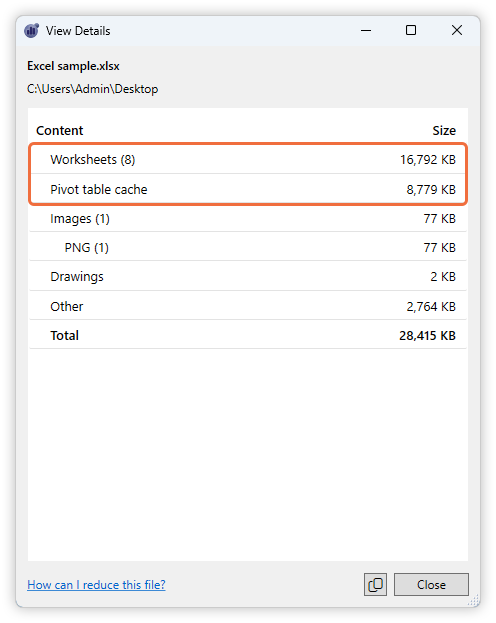
In most cases, the information in View Details maps explicitly to the reasons we outlined above. The only exception to this is large Worksheets that can be caused by one of two reasons: Excess formatting or Big data.
Not all content will be in every file, for example, if you have no embedded objects in your Excel file (like the example above) they won’t appear in the list.
How to reduce Excel file size
When you know what is making your Excel file larger, use the tips below to make it smaller. These links will jump you to the relevant sections with detailed instructions on how to reduce the size of the content you have discovered.
How to reduce the size of images in Excel
Use an Excel file compressor
The easiest way to compress all the pictures in your Excel files is to use an Excel compressor app like NXPowerLite Desktop that is dedicated to this job.
Compressor apps provide a point and click solution to compressing Excel files. As well as pictures, these apps also compress additional content such as embedded objects too. They are designed to take the hassle out of reducing file size whatever the reason behind them inflating.
Use Excel’s Compress Pictures feature
Excel has a slightly-hidden feature to allow you to compress embedded images. The instructions below are similar for both Excel on Windows and Mac.
How to use the Compress Pictures feature in Excel
Open your Excel file.
Find a sheet that contains an image or picture and click to select it.
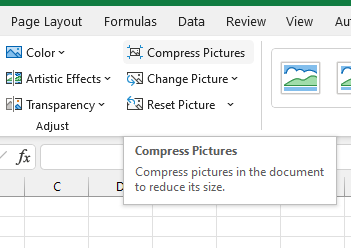
Click the Picture Format tab furthest right on the Ribbon.
Click the Compress Pictures option.
Compress Pictures in Excel on Windows

Excel Compress Picture settings
5. Ensure the Delete cropped areas of pictures option is checked if you are happy your image won’t need further editing inside Excel.
6. Choose an appropriate option for how much compression you need. A good all-rounder option is Web (150 ppi): good for web pages and projectors.
7. Uncheck Apply only to this picture if you want all of the pictures in the entire Workbook to be compressed to make your file as small as possible.
8. Click OK.
What if Excel compress pictures is not working?
There is currently only one reason we know why compress pictures doesn’t work. It cannot yet compress pictures in cell. To check if your pictures are placed in the cells, rather than over them, right-click on a picture and check the menu options. If you have a “Picture in Cell” option then it is placed in cell. For floating images the menu option will be “Place in Cell”.

We have just added a feature that will compress pictures in cells to both NXPowerLite Desktop and our online service wecompress.com.
Your other option is to move the images out of the cells, so they can be compressed using the built-in Excel compression feature. You can then place them back in the cell if needed. To move them out of the cells, right-click on each image and select “Picture in Cell” > “Place over Cells” as shown above.
How to reduce Excel file size by removing formatting
If you have huge worksheets but only a small amount of data visible it is likely to be excess formatting that is making them big. Although it’s worth making sure you don’t have tens of thousands of hidden cells — follow these instructions to check for hidden cells.
Formatting unused cells can inadvertently cause your workbook's file size to grow quickly. This can slow down not just Excel, but the overall performance of your computer when you have an excessively formatted worksheet open.
The NXPowerLite Excel Compressor can clear excess cell formatting for you automatically, or you can tackle this problem using the Clean Excess Cell Formatting command, available on Excel's Inquire tab in Microsoft Office 365 and Office Professional Plus 2013. If you don't see the Inquire tab in Excel, do the following to enable the Inquire add-in:
- In Excel click File > Options > Add-Ins
- Make sure COM Add-ins is selected in the Manage box, and click Go.

- In the COM Add-Ins box, check Inquire, and then click OK. The Inquire tab should now be visible in the ribbon.

Important: You may want to make a backup copy of your file before cleaning the excess cell formatting because there are certain cases where this process may make your file increase in size, and there is no way to undo the change.
To remove the excess formatting in the current worksheet, do the following:
- On the Inquire tab, click Clean Excess Cell Formatting

- Choose whether to clean only the active worksheet or all worksheets. After excess formatting has been cleared, click Yes to save changes to the sheets or No to cancel.
How to reduce the size of Excel file with large worksheets
If you just have a lot of data (tip: anything over 10k rows is likely to be getting big) then your best choice for reducing file size should be saving your file in the Excel binary format, which is more compressed than the standard XLSX format.
Use these instructions from Microsoft to see how to save your spreadsheet in binary (.xslb) format.
Alternatively, sometimes these files will compress further using traditional Zip compression, even if the file is in the newer XML formats (xlsx, xlsm, xlsb, xltx, xltm). Try compressing the file by following these steps:
On Windows, right-click the file in Explorer and choose the 'Send to... > Compressed (zipped) folder’.
It will change the file format to a zip (.xlsx > .zip) file but we have seen a significant reduction in file sizes using this method.
Clear PivotTable cache to reduce Excel file size
Pivot cache is an optimized copy of your source data, used for rapid queries in your Pivot Table. This makes it smaller than your source data in the majority cases. So in a file containing source data and pivot cache the biggest size reduction comes from removing the source data — but this is riskier because you will no longer be able to edit it in future.
If your Excel file has a large xl/pivotCache folder, and you need to reduce file size, you have 3 options:
You can instruct Excel not to save the cache and instead regenerate it each time you open the spreadsheet. This is the safest option, however as the cache is usually optimized, it provides the smallest reduction in size. In addition because it’s generating the cache when opening the file it can slow down file opening a little.
You can move the source data out to another file and link to it instead. This provides a larger reduction in file size but introduces a link to an external file that you then have to maintain going forward, which makes it more fragile.
Finally, you can delete the source data, just leaving the cache. This is if your source data is in the same Excel file, and it means you won’t be able to edit your source data any further, so proceed with caution.
These instructions are for the safest option - clearing the cache:
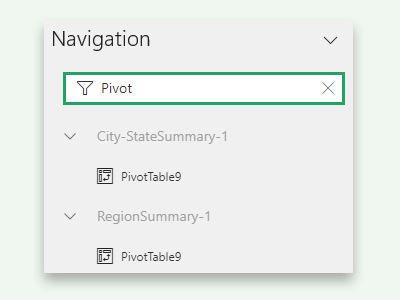
You will need to find your Pivot Tables to change their settings. To help with this use the Navigation pane to filter for and jump to each of them in turn. You can find this on the View Ribbon inside the Show section.
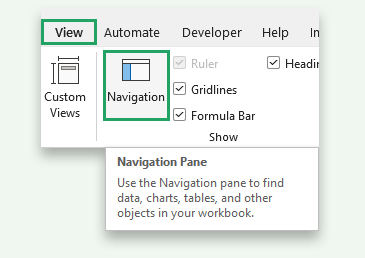
With the Navigation pane open, type "Pivot” into the filter area at the top, which will find all of your Pivot Tables and allow you to jump straight to them.
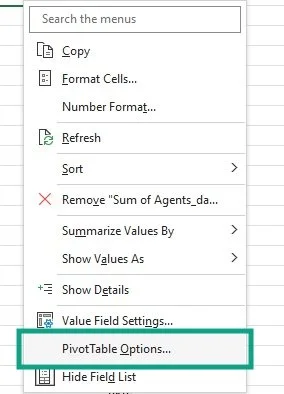
Right click in any cell inside the PivotTable
Select PivotTable Options… (also available through the ribbon PivotTable Analyze tab, in the PivotTable group, select Options)
3. Switch to the Data tab
4. Uncheck Save source data with file
5. Check Refresh data when opening file and click OK
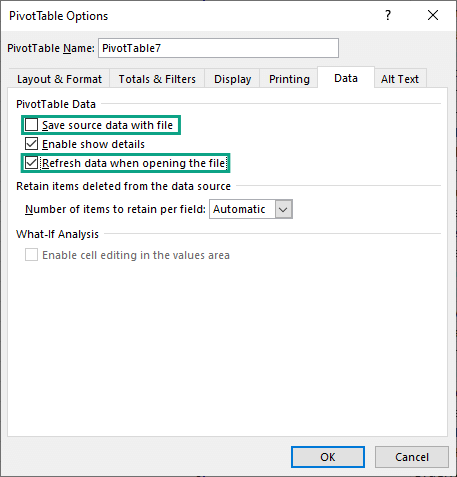
NOTE: You may need to change these settings for each PivotTable in your workbook.
How to compress embedded objects in an Excel Workbook
If you have large embedded objects in your spreadsheet you may be able to reduce them in size depending on the type and your individual needs.
Embedded documents are usually one of two types:
Embedded object with a picture representation
Embedded object as an icon
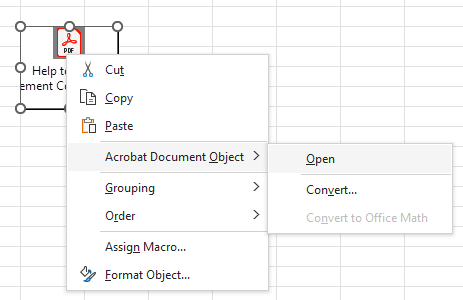
If embedded objects have been inserted using the Display as icon option then they should be fairly easy to spot, directly on the sheet - you are just looking for icons like this Adobe Acrobat Document:
Compress objects embedded in Excel as an icon
For files embedded as an icon your best option is to extract them from your Excel file and see if they can be compressed separately and then re-insert them. For PDFs or Office documents you can use a file compressor like NXPowerLite Desktop.
To extract an object as a file simply double click, or right click and select Open from under the Object’s menu (see below). This will open it in the appropriate editor or viewer.
Save the file to your computer.
Compress it with NXPowerLite or similar.
Insert > Object > Create from File (don’t forget to check Display as icon).
Delete your original object.
Embedded objects can also look just like images, making it virtually impossible to pick them out from any other images in your file by eye. However, it’s easy to find objects using the Selection Pane (Home tab > Find & Select > Selection Pane…).
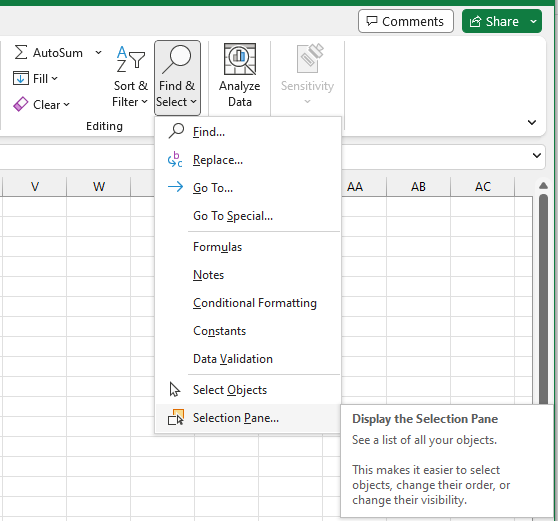
Open the Selection Pane in Excel on Windows
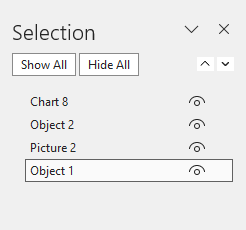
Click on each Worksheet in your Workbook keeping an eye on the Selection pane for any shapes that are named “Object...”, as shown in the picture below. Click on the object in the selection pane to select it on the sheet.
Reduce the size of objects with a picture representation
When an object is embedded as a picture in many cases the source file isn’t needed, only the picture representation. If this is the case then you can reduce the size by changing objects to simple pictures using this simple procedure:
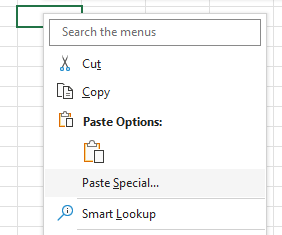
Select the object and press Ctrl+C.
Right-click in any cell near the original object and select Paste Special… (highlighted below).
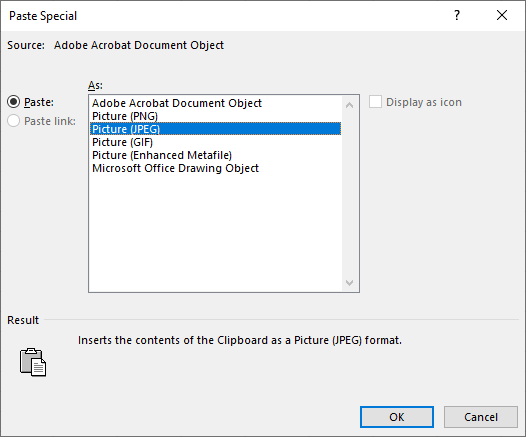
3. Select the most appropriate picture format from the list (JPEG for photos, PNG for diagrams etc.) and click OK.
4. Select the original embedded object and press Delete.
How to break links to external spreadsheets in Excel
If you have cells in your spreadsheet that are linked to data in other spreadsheets, there’s a chance that you have a snapshot copy of the data from those external spreadsheets contained within your file. This can significantly increase file size, and if you don’t need the ability to keep the data in sync then you can break these links to reduce the file size.
Important note: that this change can’t be undone, so please only do it if you are sure you don’t need the links - or work on a copy of your file, keeping a backup.
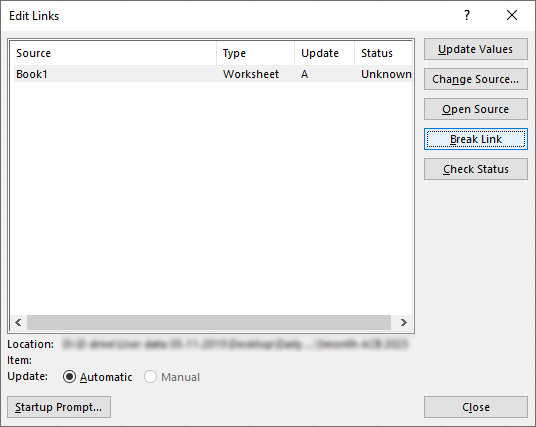
As you can see in this workbook the majority of the size is contained in the externalLinks folder.

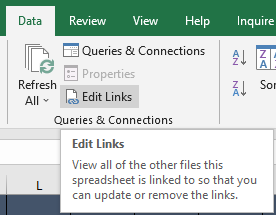
To reduce the file size, open the spreadsheet and navigate to the Data tab. Then click on Edit Links.
In the Source list select all the links you want to remove and click the Break Link button.
If the Break Link function doesn’t work then check out these instructions for how to manually fix this problem.
Should we make an Excel Add-in to help with this?
Please can you let us know if you’d be interested in an Excel add-in that made finding embedded objects and other media in your Excel files super easy. We have already built something similar for PowerPoint called Slidewise, and we’d love to know if a similar tool for Excel would be useful.
It might look something like this — as you can see it would also show you the size of images and other resources in your spreadsheet.
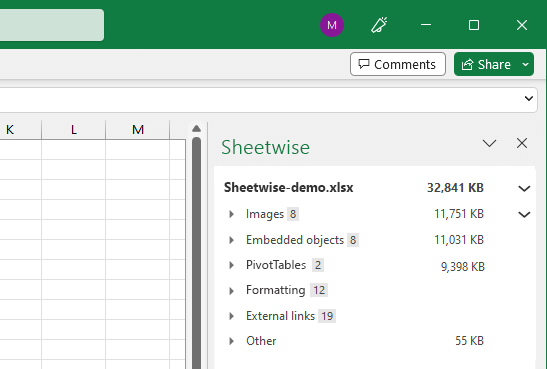
Mockup of what our Excel add-in could look like
Register interest
If you’d be excited to add Sheetwise to your toolbox - please can you share your email with us to let us know. If you do we’ll also keep you notified of any progress.