How to find embedded objects and charts in PowerPoint with Slidewise
Finding embedded OLE objects within a presentation is very time-consuming and prone to human error, which can leave you pulling your hair out in frustration. Whether the objects are large, or you need to avoid distributing sensitive data hidden behind an Excel chart, we show you how to quickly find these files.
Find embedded objects in PowerPoint with Slidewise
Download and install the Slidewise Add-in for PowerPoint to instantly see any embedded objects or chart data in your presentation and jump straight to them. It also lets you to remove embedded chart data with a single click.
After installing Slidewise, you’ll have a new icon on your ribbon.

Click this button to launch Slidewise, which will scan your presentation and show you all of the embedded objects and embedded charts. You will be able to see how many objects you have and how big they are. Right-click or use the menu to Show the object in PowerPoint.

Slidewise is available free forever with just the essential features, or pay for a license for the advanced features. It has a 30-day fully functional trial so why not give it a go on your presentations to make your own mind up.
How to replace an embedded object with a picture
In order to reduce file size, or you want to delete the hidden data, you can change objects to pictures by following this simple procedure.
- Select the chart or object and press Ctrl+C.
- Right-click on the slide and select paste as picture (highlighted below)

- Select the original embedded object and press Delete.
Finding embedded objects in PowerPoint manually
If you can’t use Slidewise for some reason, then here are steps you can use to tell if your presentation has embedded objects, check their total size, and how to manually find objects on your slides without using extra tools.
Firstly, you can see if you have any embedded objects by using the document inspector (File > Check for issues > Inspect document). If you do then you’ll see a warning like this:

If embedded documents have been inserted using the “Display as icon” option then they should be fairly easy to spot, directly on the slide - just look for things like this:
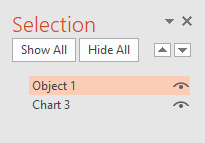
However, many objects may just look like images or charts, making it difficult to pick them out on the slide. To help you find them more easily open the Selection Pane (Home tab > Select > Selection Pane…).

Then click through each slide in your presentation looking out for any shapes that are named “Object...”, as shown in the picture below.
How to check the size of embedded objects
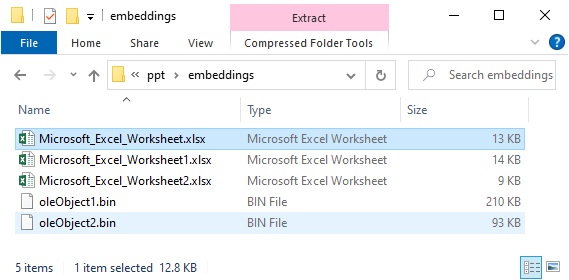
It isn’t possible to see how large objects are using PowerPoint. So if you need to find out how much of your presentation size is caused by objects you can use this method instead.
In Explorer change the .pptx file extension of your presentation to .zip and double click it to open the contents.
Note: You may need to make file extensions visible, by selecting the “View” tab in the ribbon and then checking “File name extensions”, as shown here:

Look inside the ppt\embeddings folder to see a list of the objects and how big they are.
You may also like:
Take a look at our 5-star rated PPT Compressor - it’s the easiest way to keep PowerPoint file sizes small.