Why is my Word document so large and how can I reduce the DOCX file size?
Having finely crafted an award-winning document it can sometimes come as a bit of a shock when you realise just how large your Word file has become in the making. Too large to share and no obvious pointers to what exactly is driving up the size, it’s enough to upset anybody’s day.

Problems caused by large DOCXs
Large DOCX files cause many problems, such as:
DOCX files too big to send by email
Needing a file transfer service to share a Word document with a client
Word document opens very slowly
Collaboration with large Word documents is slow and cumbersome
Wasted time investigating what makes a Word document so big?
When answering the question: “So how do Word documents get so big?”, most experts can talk in generalities about the cause of the issue. ”It could be large images” or “maybe there is an embedded video”, but unless you know the specific elements that are driving up the file size, you cannot apply the best solution to reduce the size of your document.
File size can balloon unexpectedly because, as content is added and edited, it's not always obvious when a change has a dramatic effect. Compounding this, Word isn't optimized for keeping file size minimal and has inherent "quirks" that can cause surprising inflation. These two factors are the main contributors to large Word file sizes.
The key to easily reducing your Word file size is knowing what content is driving up the size!
In this article, we summarise the content types that lead to bloated files, show you how to pinpoint the offending element, and then provide lots of useful techniques to help you reduce the size of your Word files.
Also, our new Word add-in will show you why your documents are so big. Join the waitlist to be notified when it's ready!
What makes the DOCX file size so large?
IMAGES - Large images are the most common reason for Word documents to increase in size.
FONTS - Embedded fonts can be large - do you really need them to be embedded?
EMBEDDED CHARTS - charts can easily carry in extra baggage when pasted from Excel.
EMBEDDED OBJECTS - sometimes you just need the picture representation rather than the whole object.
How to find out why your Word file is so big
Don’t waste time guessing, use our file size audit tool to see exactly what is eating the space in your document and preventing further size reduction.
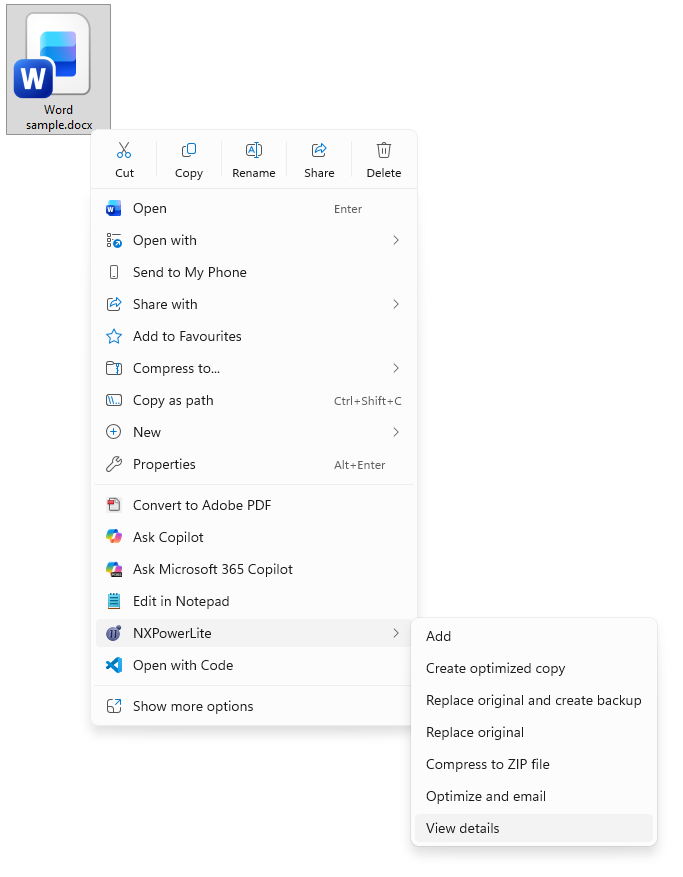
Download the fully-functional free trial of NXPowerLite Desktop, and once installed, right-click on your DOCX file and choose NXPowerLite > View details.
After opening View details you will see the content is organized by size, with the largest items listed first. In this example, you can see Fonts account for the majority of the size. Once you know what content is not being compressed, you can address it using the help below.
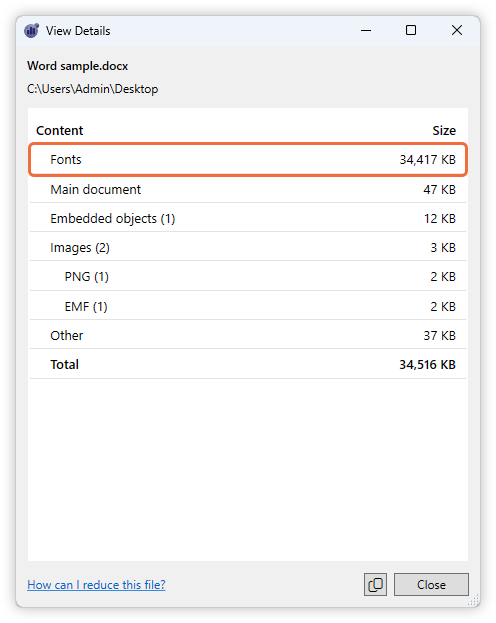
In most cases, the information in View Details maps explicitly to the reasons we outlined above.
How to reduce Word file size by editing the content
Having discovered precisely what is making your file larger, you can now go about editing your file to make it smaller. Use the links below to jump to the relevant sections with detailed help on how to reduce the size of the large content elements you have discovered.
How to reduce the size of images in your DOC
Use a DOCX compressor
The easiest way to compress all the pictures in your Word document is to use a Word Compressor app like NXPowerLite Desktop, which is designed specifically for this task.
These apps provide a point and click solution to compressing files. As well as images, these apps also compress additional content such as embedded charts and objects too. They are designed to take the hassle out of reducing file size whatever the reason behind them inflating.
2. Use Word’s Compress Pictures feature
You may not yet have seen it but Word has a slightly-hidden feature to compress your images. The instructions below are similar for Word on Windows and Mac.
How to use the Compress Pictures feature in Word
Open your Word file.
Find a page that contains an image or picture and click to select it.
Click the Picture Format ribbon at the top of the screen.
Click the Compress Pictures option.

Windows

Mac
5. Ensure the Delete cropped areas of pictures option is checked if you are happy you won’t need to further edit any images that are cropped inside Word.
6. Choose Email (96 ppi): minimize document size for sharing.
7. Uncheck Apply only to this picture if you want all of the pictures in the entire document to be compressed so you will have a smaller file size.

Windows

Mac
8. Click OK.
What if the images don’t compress enough?
There are two common reasons that you might be unable to reduce the size of images sufficiently using the methods above.
1. Images with artistic effects applied
When you apply an artistic effect Word will create a WDP version and a PNG version of the image. It does this so it can apply the effects losslessly and revert them if you need. Compress pictures can reduce the PNG, and Word will regenerate the WDP file, but if your image started as a photo jpg then it can still be several times bigger than you’d like. To fix this you’ll need to export the image with effects as a JPG and reinsert it, deleting the version that’s there - we’ve written in more detail about how WDP files work in PowerPoint and the process for optimizing them is the same in Word.
2. EMF files (Enhanced Metafile)
Sometimes images are saved in Word as EMF files that can be very large indeed. Neither NXPowerLite or the Compress pictures feature in Word currently compress these images. However, there is a simple workaround.
Once you have located the EMF file simply right-click on it in Word and select copy (Ctrl+C), then right-click somewhere else on the page and choose the Paste as picture option. This will generally give you a visually identical copy of the image, only this new image will be a PNG file and likely a lot smaller. Now you can delete the EMF version and save your file.

A note about grouped images or shapes with image backgrounds
Historically, our Word compressor, NXPowerLite, was unable to compress shape backgrounds and grouped images. However, with the release of version 11 on Feb 24, 2026, NXPowerLite Desktop can now compress these specific elements.
To learn more about why shape backgrounds and grouped images cause Word document sizes to increase, you can read our dedicated blog post on the topic here.
Fix bloated fonts in Word
Fonts will add to your document file size when they are embedded, sometimes significantly. They do ensure that others viewing and editing the file will see the document exactly as you intend - but there are other options achieving this.
Stop embedding or subset fonts
If you see that fonts are taking up too much space in your file then your first option is to stop embedding them or subset the fonts to keep them embedded but only save the characters used in your document.
For instructions on this read How to Embed, Subset or remove fonts in Word.
Rationalize fonts
Check if all of the font types are necessary? It is a really good idea to strip out any fonts that aren’t being used and replace them with other fonts already used in the document. We have a guide showing how to list all fonts used and replace them in bulk.
Use Cloud Fonts
A good compromise if you wish to ensure that your document renders the same every time it is opened, but also does not inflate the size of the file when you use a new font. Cloud fonts are stored in the cloud and downloaded on-demand as the document is opened. There are some known restrictions and compatibility issues with using cloud fonts. Before considering using cloud fonts, an essential read is A Guide to Cloud Fonts in Microsoft Office 365 written by PowerPoint MVP Julie Terberg of Design to Present.
How to compress embedded charts or objects in a Word document
The methods for dealing with embedded objects or charts is pretty similar, so we have combined them here. Embeddings roughly fall into 3 categories:
Embedded chart data
Embedded object with a picture representation
Embedded object as an icon
If you look in the /embeddings folder and find lots of large Excel files, then you can be pretty sure that the size issue is being caused by extra Excel data being embedded with your charts. This happens because when you copy a chart from Excel into Word, by default it will embed the whole Excel file into your document along with the chart. This is even if the chart data is only present on one of your sheets.
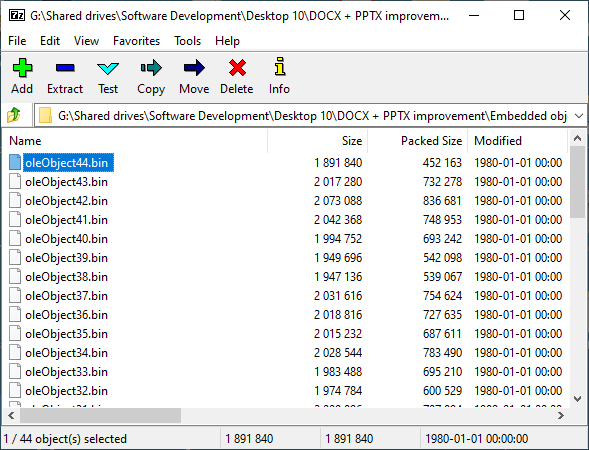
The other type of content you are likely to find in the embeddings folder are lots of .bin files like this example below.
Finding charts is pretty straightforward, but finding obects can be a little harder.
If embedded objects have been inserted using the Display as icon option then they should be fairly easy to spot, directly on the page - you are just looking for icons like this Adobe Acrobat Document:
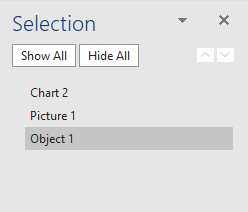
However, many objects may just look like images, making it difficult to pick them out on the pages. To help you find them more easily open the Selection Pane (Home tab > Select > Selection Pane…).

Then scroll through each page in your document looking out for any shapes that are named “Object...”, as shown in the picture below.
Or even easier you can press Ctrl+G to call up the Go To tab on the Find and Replace dialog. Then just select Object from the Go to what list and then Any object from the dropdown and click Next.
Reduce the embedded chart or object size in Word
Once you have discovered which objects are causing the file size to inflate and found them in your doc, there are three options to manually compress the size — or the Word Compressor mentioned earlier NXPowerLite Desktop can do this for you automatically.
For objects set to Display as icon we do not recommend flattening to a picture as the embedded file will be lost.
Flatten to a picture
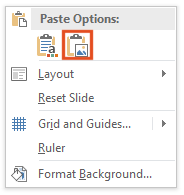
This approach can work for any embedded object that hasn’t been embedded as an icon, or charts. You can simply change the objects to pictures by following this simple procedure. Once this is done the chart data points cannot be edited. This is also helpful if you want to remove the hidden data to prevent sharing sensitive information.a. Select the chart or object and press Ctrl+C.
b. Right-click on the slide and select paste as picture (highlighted below)
c. Select the original embedded chart or object and press Delete.
2. Extract and compress object
Depending on the file type of the embedded object you may have the option to compress the file. For example, if one of the embedded objects is a PDF file, you may be able to use a PDF compressor app, such as NXPowerLite Desktop, to compress the PDF file. Then you can replace the original embedded PDF with a smaller compressed version. To extract the file simply double click on the icon or picture to launch it in its default application, then save a copy to your computer. Then compress the copy and replace the version in your document with the smaller version.
3. Link the embedded file
Instead of embedding an object by pasting or inserting it, you could consider linking to the file instead. Once linked it is still possible to edit the linked file’s data but links do not increase the file size of the presentation. However, you will need to consider whether the linked file will be always available, especially when shared.
Hopefully you now have the skills to quickly figure out what is increasing the size of your Word documents and how to deal with it. If you come across anything in a document that is making it too big and you can’t fix it - then please feel free to contact us - we love hearing about new content that is causing size issues in Word.
A quick reminder that our new Word add-in will show you exactly why your documents are so big. Join the waitlist to be notified when it's ready!
We have already built something similar for PowerPoint called Slidewise, and we’re excited to bring the same tools over to Microsoft Word soon.