Why is my PowerPoint file so large and how to reduce PPT file size?
There is no doubt that PowerPoint is an awesome tool used by both design professionals and business users to create slick, state-of-the-art presentations. However, it does have its well-documented issues, and by far the most talked-about issue is how the files it produces can become so large.

Problems caused by large PPTs
Large PPT files cause all sorts of common problems and you regularly hear the following user complaints:
What is inside my PowerPoint that makes it so big?
My PPT file is too big to email
I have to use a file transfer service to get a PPT file to my client
My PowerPoint presentation opens really slowly
Collaboration is very slow and clunky with any large PowerPoint presentation
When answering the question: “So how do PowerPoint files get so big?”, most experts can talk in generalities about the cause of the issue. ”It could be the images” or “maybe it has an embedded video”, but until you know what specific elements are driving up the file size, you cannot apply the best solution to reduce the size of your presentation.
As users add and edit content they do not generally know the consequences of their actions in terms of file size. Also, PowerPoint is not always 100% focused on keeping the overall file size down and has some interesting quirks that can inflate the size unexpectedly. Both of these factors contribute to a large presentation file size.
It stands to reason that if you know what elements are driving up the file size, reducing the size of a PowerPoint file is much easier!
In this article, we’ll discuss each content type that can contribute to file bloat, and how to pinpoint the offending element. Finally, we’ll talk about lots of useful techniques to reduce the size of your PowerPoint file.
5 common reasons PPT file sizes gets so large
IMAGES - The most common reason for presentations to increase in file size with a vast amount of accepted file types, editing options and quirks.
FONTS - Embedded fonts can be large, but do you really need them to be embedded?
EMBEDDED CHARTS & OBJECTS - Can hugely increase file size depending on the size of the file being embedded.
AUDIO OR VIDEO - Video files tend to be fairly big with HD & 4K video commonplace. But do you need to embed them?
UNUSED SLIDE MASTERS & LAYOUTS - Within your presentation, you can accumulate hidden or unused slide masters and layouts, which if discovered could be deleted to reduce file size.
Apps for smaller PowerPoint files:
Use our one-click PPT Compressor
See exactly why your file is large with Slidewise
How to find out what is making your PPT file so big
Rather than wasting time guessing which methods to compress your PowerPoint file are most suitable, wouldn’t you like to be a little more precise and know exactly what is eating the space in your presentation?
Below are a couple of suggestions on how you can see the breakdown of content within your file so that you can pinpoint the offending (large) elements. Then you can use the most suitable approach to compressing the PowerPoint file (see How to reduce PowerPoint file size by editing the content below) and save yourself hours of time and energy.
Use Slidewise PowerPoint Add-in
Slidewise is the most powerful way to see a comprehensive breakdown of content inside your presentations. It comes with a fully functional 30-day trial that gives you immediate, unrestricted access to the complete toolset.

After the trial you can keep using some of the essential features for free, or you can upgrade to keep the pro tools.
Once installed it displays all the content in a tree which you can easily navigate to see more information about individual items. It lists the size of each content element and you can jump to them in PowerPoint by double-clicking. This makes it super-easy to find the specific contents that are driving up the size of the file.
The paid version also includes numerous essential tools to help reduce the file size, such as the ability to unembed fonts or remove embedded Excel chart data, or delete unused slide masters.
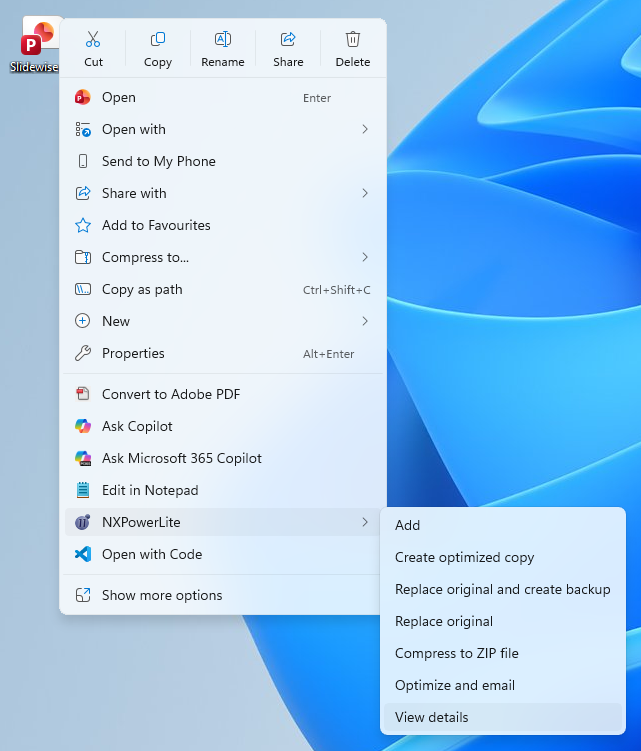
NXPowerLite View Details
We built a file size audit tool into NXPowerLite Desktop that lets you see exactly what's consuming space and preventing further size reduction.
Download the fully-functional free trial, and once installed, right-click on your PowerPoint file and choose NXPowerLite > View details.
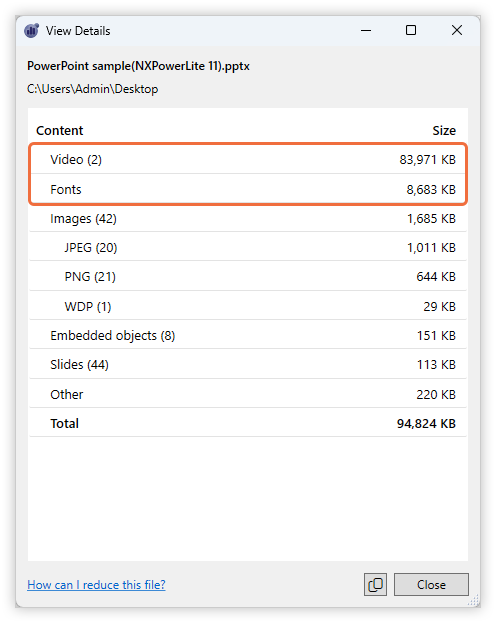
After opening View details you will see the content is organized by size, with the largest items listed first. In this example, the majority of the size is accounted for by 2 videos (84 MB), although fonts account for another 8.6 MB.
Once you know what content is not being compressed, you can address it using the help below.
How to reduce PowerPoint file size by editing the content
Having discovered precisely what is making your file larger, you can now go about editing your file to make it smaller. Use the links below to jump to the relevant sections with detailed help on how to reduce the size of the large content elements you have discovered.
How to reduce the size of images in your PPT
Use an automated PPT compressor
The easiest way to compress all the pictures in your PowerPoint presentation is to use a PPT Compressor application, or online tool like WeCompress.com.

In both online and offline apps, it’s really easy to drag and drop or choose your file for compression. The default settings are usually spot on to achieve maximum reduction without leaving any nasty pixelated images in your deck. Best of all, you are likely to get some compression of additional content such as embedded charts, or a reduction in embedded font sizes too.
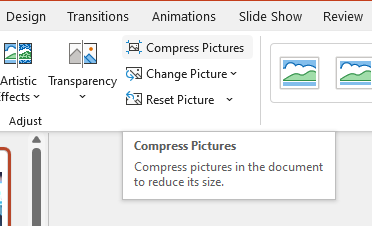
2. Use PowerPoint’s compress pictures feature
You may not yet have seen it but PowerPoint has a well-hidden feature to compress your images. The instructions below are similar for PowerPoint on Windows and Mac.
How to use the Compress Pictures feature in PowerPoint
Open your PowerPoint file.
Select a slide that contains an image or picture and select it.
Click the Picture Format ribbon at the top of the screen.
Click the Compress Pictures option.
Windows

Mac
5. Select the checkbox to Delete cropped areas of pictures option to reduce the size of the image or picture in the presentation.
6. Choose Email (96 ppi): minimize document size for sharing.
7. Uncheck Apply only to this picture if you want all of the pictures in the entire presentation to be compressed so you will have a smaller file size.

Windows

Mac
8. Click OK.
What if the images don’t compress enough?
There are 2 main reasons that the size of images might not reduce sufficiently using the methods above.
1. Images with artistic effects applied
When you apply an artistic effect to an image, PowerPoint will create a WDP version and a PNG version of the image. It does this so it can apply the effects losslessly and revert them if you need. Compress pictures can reduce the PNG, and PowerPoint will regenerate the WDP file, but if your image started as a JPG then it might still be several times bigger than you’d like. To fix this you’ll need to export the image with effects as a JPG and reinsert it, deleting the version that’s there - we’ve written in more detail about how to shrink WDP files in PowerPoint.
2. EMF files (Enhanced Metafile)
Sometimes images are saved in PowerPoint as EMF files that can be very large indeed. Neither NXPowerLite or the Compress pictures feature in PowerPoint currently compress these images. However, there is a simple workaround.
Once you have located the EMF file simply right-click on it and select copy (Ctrl+C), then right-click somewhere else on the page and choose the Paste as picture option (highlighted below). This will generally give you a visually identical copy of the image, only this new image will be a PNG file and likely a lot smaller. Now you can delete the EMF version and save your file.

Fix bloated fonts in PowerPoint
The size of fonts in a presentation is often overlooked but it is essential to consider if you wish to reduce the overall size of your presentation.
Here are some of the considerations and fixes to use when looking at the fonts in your presentation.
Rationalize and replace fonts
Are all the various font types necessary in the presentation? It is a really good idea to strip out any fonts that aren’t being used and replace them with other fonts already used in the presentation, such as the Theme fonts. You can use PowerPoint’s replace fonts feature or if you have a lot of fonts, or are struggling to find them all, you can use Slidewise to reliably replace the fonts in bulk wherever they are lurking.
Font embedding
PowerPoint has trouble rendering fonts in presentations that aren’t present on the system that it is viewed on, so it substitutes the font with a best-match. This can cause display and layout issues. Embedding fonts will ensure that they always display correctly but it will drive up the size of your file.
Subsetting embedded fonts will reduce the size of the embedded fonts. This technique ensures that only the characters used in the presentation will be embedded in the presentation so it may mean that PowerPoint restricts how the text can be edited.
Read How to Embed, Subset or remove fonts in Powerpoint or Word for more details.
Use cloud Fonts
A good compromise if you wish to ensure that your presentation renders the same every time it is opened, but also does not inflate the size of the file when you use a new font. Cloud fonts are stored in the cloud and downloaded on-demand as the presentation is opened. There are some known restrictions and compatibility issues with using cloud fonts. Before considering using cloud fonts, an essential read is A Guide to Cloud Fonts in Microsoft Office 365 written by PowerPoint MVP Julie Terberg of Design to Present.
How to compress embedded charts or objects in a PPT presentation
There are several ways in which you can embed charts or objects into your presentation. For example, if you copy a chart from Excel, PowerPoint will handily embed the whole Excel file into your presentation. This is even if the chart data is only present on one of your sheets. Embedded objects can also similarly inflate the size of your presentation, especially if there are many embedded objects. You can check the size taken up by embedded charts or objects in your presentation in two ways:
Manually
Follow the instructions in the above section ’Extract the file contents to a zip file’ and look inside the ppt\embeddings folder to see a list of the objects and how big they are.Automatically
Use Slidewise to easily find large embedded objects and charts. For more details read our blog post: How to find embedded objects and charts in PowerPoint with Slidewise
Reduce the embedded object data size in PowerPoint
Once you have discovered which objects are causing the file size to inflate there are three options to compress the size. Take care to check how the object has been embedded as it is possible to embed the object as an icon (an icon of the file type is displayed in the presentation). If this method has been used then we do not recommend flattening the object to a picture as the embedded file will be lost.
Flatten to a picture
To reduce file size, or if you have an embedded Excel object or chart and you want to eliminate the hidden data, you can change objects to pictures by following this simple procedure. Once this is done the chart data points cannot be edited.a. Select the chart or object and press Ctrl+C.
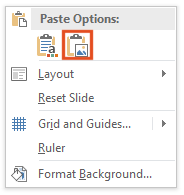
b. Right-click on the slide and select paste as picture (highlighted below)
c. Select the original embedded chart or object and press Delete.
2. Extract and compress object
Depending on the file type of the embedded object you may have the option to compress the file. For example, if one of the embedded objects is a PDF file, you may be able to use a PDF compressor app, such as NXPowerLite Desktop, to compress the PDF file. Then you can replace the original embedded PDF with a smaller compressed version.
3. Link the embedded file
Instead of embedding an object by pasting or inserting it, you should consider linking to the file instead. Once linked it is still possible to edit the linked file’s data but links do not increase the file size of the presentation. However, you will need to consider whether the linked file will be always available, especially when shared.
4. (Embedded charts only) Remove the embedded Excel file and keep the chart
It is possible to remove the underlying data file (or linked file for that matter) and for the chart image to remain unchanged. This is a good idea if you have security or data-sharing concerns. To remove the embedded Excel file and keep the chart you can use the handy add-in Slidewise.
How to reduce the size of audio or video in PPT files
Once you have determined that your presentation contains large video or audio files then you have a few options to consider to reduce their size:
Compress media
PowerPoint has an in-built feature to compress your media. By Exploring the different options you can usually create smaller media files with sufficient quality. For instructions on how to compress your media in PPT see this article from Microsoft.

It may be also possible to get smaller file sizes by manually compressing and replacing the media. You can try a free online service or a free desktop tool such as Handbrake.
Link to media
As with embed objects you can choose to link to the media file instead of embedding it. Again, you should consider where the linked file is stored and how people who view the PPT can access it.
Link and embed an online file
Another option is to upload your media to an online media service such as YouTube. PowerPoint allows you to embed an online video right in the presentation and this does not inflate the file size at all. For more details, read Bright Carbon’s How to embed a YouTube video in PowerPoint.
How to remove unused slide masters and layouts in a PPT file
It is easy for presentations to end up using more than one slide master. Just copying a slide from another deck or combining two separate decks can cause new slide masters (and all their layouts) to be inserted. If the layouts have multiple images or other media this can drive up the file size. A quick tip to see the size of your masters and layouts - save a copy of the file and delete all the slides. What's left is the total MB of the masters or thereabouts!
How to view the number of slide masters in your PPT
Open your presentation.
Under the View tab, click Slide Master.
On the left-hand side, you’ll see all the layouts, grouped by Slide Master. Scroll down the list to find each Slide Master.
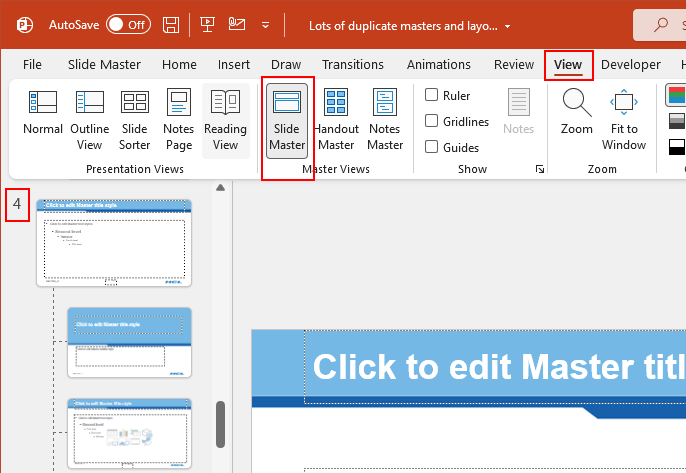
Slide master view in PowerPoint
Below we have collected together a few approaches to reduce the size impact of multiple or unused slide masters.
Re-assign slide layouts
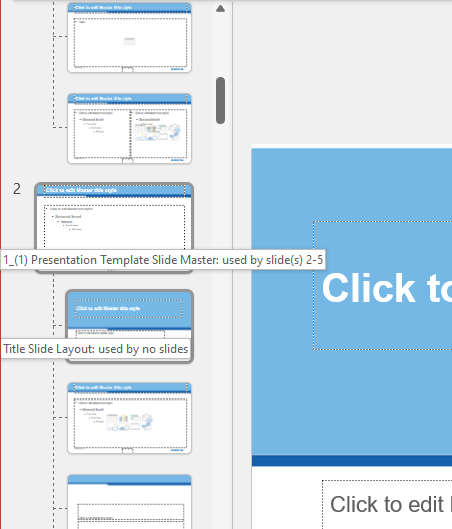
A good first approach is to try to rationalise your slide layouts so that only those used in one slide master are used. In the PowerPoint Slide Master View, it is possible to roll over a layout to reveal a tooltip showing which slides use it. However, if you are trying to identify unused slide masters or layouts, you will have to look at each layout one at a time, which is very time-consuming. It’s also hard to reconcile this view with the slides in your presentation.
Navigating from this view to make any changes to your presentation requires taking notes, and/or lots of moving between views - it is slow and also error-prone.
However, armed with this knowledge you can set about re-assigning individual slides all from the same master. To do this:
Switch to Normal in the View tab. Then right-click the slide in question and reassign the layout to one in your chosen slide master.

Once you have rationalized your layouts to use only those in your chosen Slide Master the other Slide masters should be automatically deleted when PowerPoint next saves the file unless they are marked as preserved. However, if you are sure you want to delete a ‘Preserved’ Slide Master, follow the steps below:
Open your presentation.
Under the View tab, click Slide Master.
Right-click the Slide Master you wish to delete
Use the Preserve toggle button to set or unset the preserve status

Easily manage Slide Masters and layouts
Thankfully there is a quicker and easier way to manage Slide Masters and Layouts in PowerPoint. Read Find unused slide masters in PowerPoint with Slidewise for more details.
Clean up messy PowerPoint files faster with Slidewise
We initially built Slidewise to help find large images within PowerPoint, but as we progressed we found many other problems that were hard to overcome in the current UI. The Slidewise add-in’s unique indexing of the content in your file allows you to find and fix problems with ease.

With Slidewise installed you are sure to keep on top of issues with any of your content and be confident that there will be no problems when sharing the presentation. It includes lots of useful time-saving fixes such as:
Find and jump to large or troublesome content easily
Replace multiple fonts and fonts that PowerPoint can’t
Highlight poorly compressed or unevenly scaled images
Find and consolidate unused slide masters and layouts
Warnings for common issues e.g. Substituted fonts or broken links
And best of all, there is no more rummaging around in the XML to find references to rogue fonts or color references. You can track all of these down easily. Check out Slidewise now.